Published by M&A Composite Ltd • 18 October 2026
Custom briefs development checklist: align coverage, materials, leg openings and waistband construction before bulk approval.
Scope: practical development guidance for private label men’s cut and sewn briefs. Example images are product references, not test or certification evidence.
Table of contents
Custom briefs: define the product before requesting a price
Custom briefs require a clear agreement on coverage, stretch, waistband tension and leg opening shape. A garment can look balanced on a hanger while feeling completely different when worn. For a private label collection, the useful starting point is therefore a product definition that explains who will wear the brief, where it should sit and what the brand expects after washing. A photograph is a helpful reference, but it cannot replace these decisions.
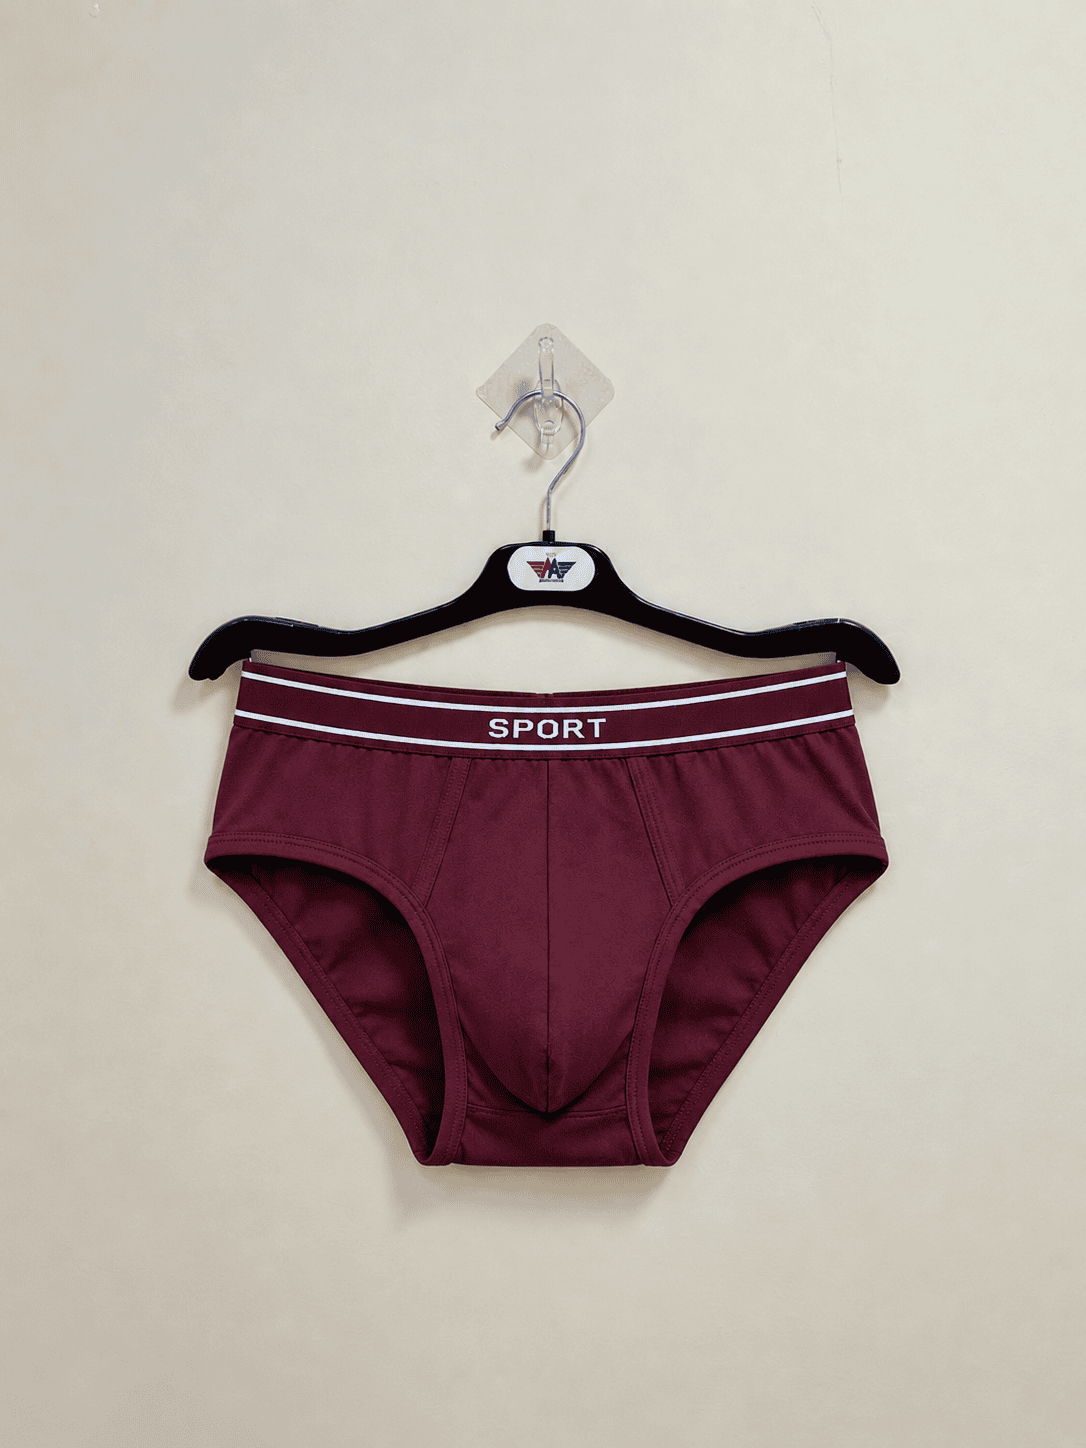
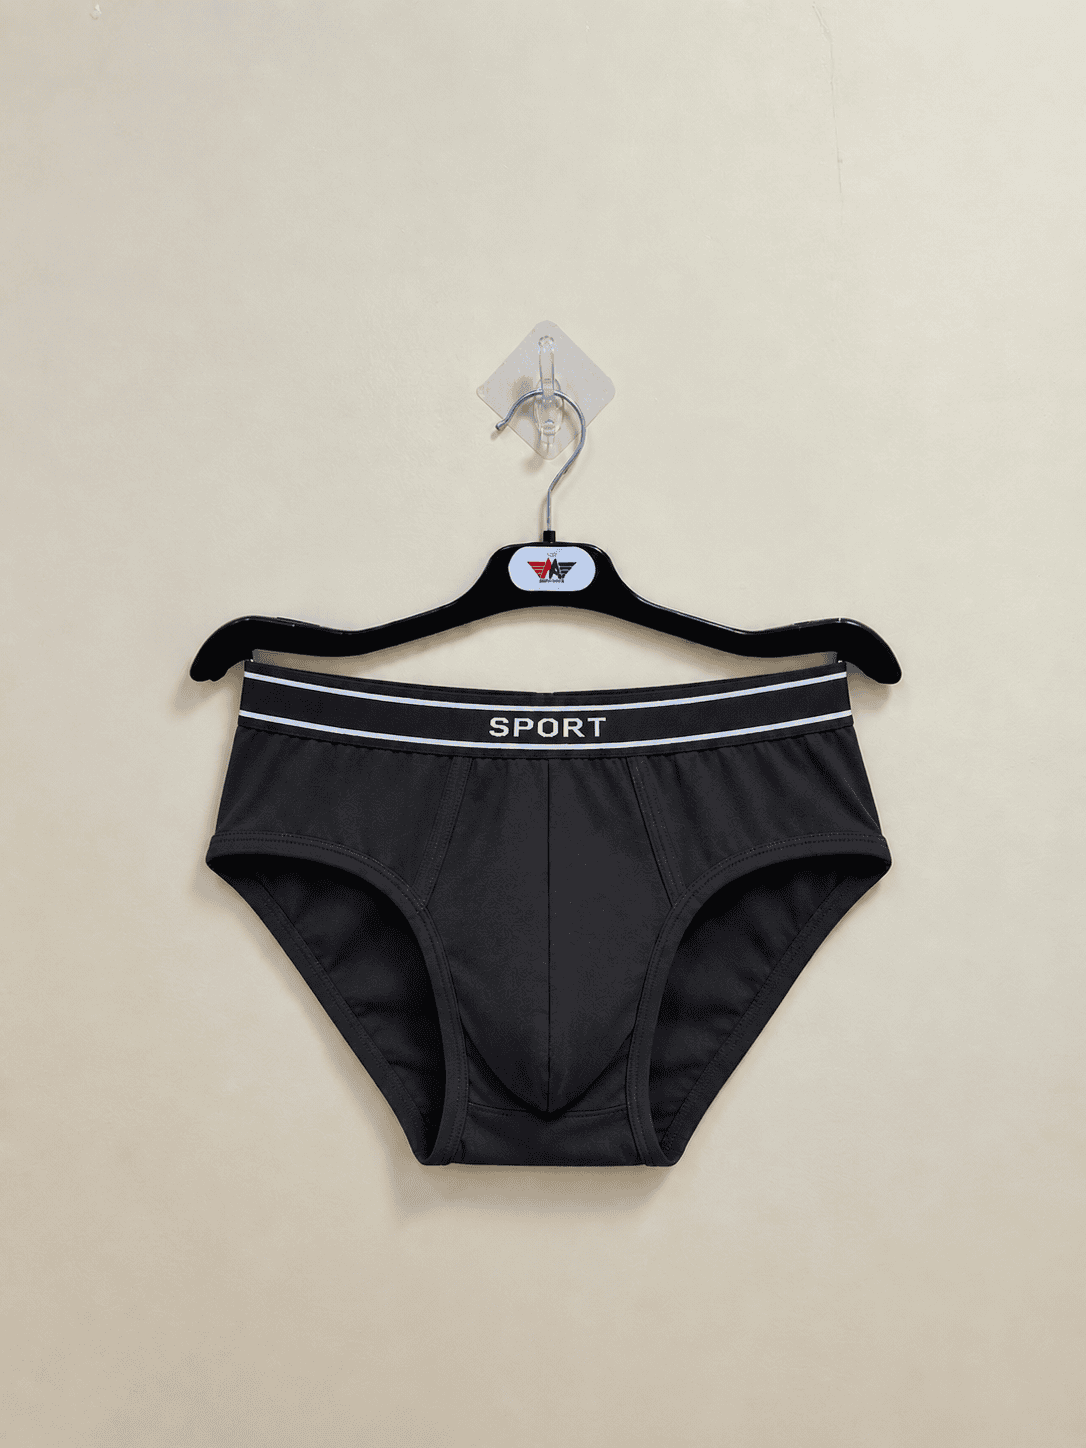
This article focuses on men’s cut and sewn briefs with a shaped front and elasticated waist. The photographed examples come from the M&A Composite Ltd media collection and link directly to the Brief product page. They illustrate visible design features only. Their appearance does not establish fibre composition, certified status, production availability or permission to reproduce the lettering on the waistband. Confirm those details for your own development project.
Briefs also deserve a separate specification from boxer briefs. Removing the leg length from an existing boxer pattern does not automatically produce a balanced brief. The curve around the upper leg, width of the side section and relationship between front and back coverage change the fit. A brand developing both styles should maintain separate approved patterns and measurement sheets while documenting any shared fabric or waistband references.
Use the following checks to prepare an enquiry, compare development options and record sample approvals. The recommendations are practical planning guidance rather than a statement of fixed M&A order terms. Minimum quantities, materials, testing, prices and delivery dates need written confirmation against the actual specification. Start with the Brief manufacturing collection and use the checklist to explain the differences your collection needs.
1. Specify coverage, rise and the intended customer
Begin with a front and back drawing that shows the waist position and the amount of coverage around the seat. Describe the intended wearing position in plain language, then connect it to measurable pattern points. Terms such as classic, sport and low rise are interpreted differently across brands. They are useful merchandising labels, but they should not be the only instructions given to a pattern maker.
Define whether the side section should look narrow, moderate or relatively deep. A narrow side changes both the visual silhouette and the available space for the leg opening curve. A deeper side may provide more coverage, but it still requires a compatible back shape. Record the desired appearance from front, side and back rather than approving a single attractive front photograph and assuming the remaining views will follow.
Identify the customer group and size system without assuming that every market uses the same body proportions. A retailer’s existing fit block can be useful if its ownership and suitability are clear. Where a brand has no established block, plan a development sample and a structured fitting review. Select participants appropriately, obtain consent for any photographs and keep identifying information out of the ordinary production feedback sheet.
Finally, separate essential requirements from exploratory preferences. A fixed waist position may be essential, while a decorative seam could remain open for discussion. This distinction helps the supplier propose alternatives without silently changing the product identity. The output of this stage should be one short design brief, labelled sketches, a proposed size range and a list of unresolved decisions with an owner for each answer.
2. Write a fabric specification beyond the fibre name
A request for cotton briefs leaves important variables unanswered. State the proposed fibre blend, knit construction, finished fabric weight, colour reference and expected hand feel. Include whether the sample fabric is a nominated quality or a development suggestion. Where the composition remains undecided, ask for clearly identified alternatives instead of allowing the first available sample to become an accidental production standard.
For stretch fabrics, record the direction of greatest stretch and how that direction should be placed in the garment. A small swatch can feel soft while providing an unsuitable level of support once cut into a front panel. Ask the technical team to assess the complete construction, including elastic and stitching. Fabric stretch, garment dimensions and elastic application should be reviewed together rather than approved as unrelated components.
Specify the condition in which the material is assessed. A sample measured immediately after manipulation may differ from one allowed to rest under agreed conditions. The testing laboratory or technical team should define the relevant method, conditioning and acceptance criteria. Avoid treating a casual hand stretch as evidence that bulk material will recover consistently or remain within the brand’s fit requirements after laundering.
Keep a physical approved swatch and a digital material record carrying the same reference. Record supplier identification, colour, sample date and revision status. If an alternative is proposed later, compare it against the approved reference and repeat the affected garment checks. An apparently minor change in finish or weight can justify a new fitting review, especially when the original pattern depends on a particular stretch response.
3. Balance front rise, back rise and waist position
Front and back rise measurements should describe a repeatable measurement route. State whether the waistband is included, which seam or edge is the starting point and whether the brief lies flat without stretching. Add a diagram showing the tape position. Two people can produce different numbers from the same garment if one follows a curved seam while the other measures a straight line between endpoints.
A brief that appears too low at the back does not necessarily need the same increase at the front. Consider the relationship between the back panel, seat coverage and waist location before issuing a general instruction to make the garment taller. Similarly, a front that folds or feels excessive may need pattern balance changes rather than a shorter elastic loop. Describe the symptom and let the technical response identify the responsible component.
During fitting, review standing and ordinary seated positions as agreed for the product. Record whether the waistband remains near the intended position and whether the leg edges remain comfortable. Feedback should describe observable behaviour, such as back waist dropping during sitting, instead of using only a broad judgement such as poor fit. Avoid medical interpretations or claims that a particular pattern provides health benefits.
Approve the finished pattern with the actual proposed waistband and fabric wherever possible. A preliminary fit made in a substitute material is useful for development, but its limits must be visible in the approval record. If the final elastic changes the waist position, the earlier sample cannot serve as complete evidence for bulk release. Identify which fit points need confirmation and close them before the production pattern is locked.
4. Engineer the leg opening for coverage and comfort
The leg opening is one of the defining differences between custom briefs and longer underwear styles. Its shape affects how the garment sits at the front crease and across the lower seat. Specify the measurement route, the finished edge width and whether the opening is bound, turned or elasticated. Make the reference sample available so the team can compare both the appearance and the construction from inside.
Distinguish the cut edge from the finished opening. Binding width, elastic length and application tension can alter the final opening even when the pattern pieces are identical. If a sample feels tight, widening the pattern alone may not address the actual cause. Ask the supplier to document the pattern revision and elastic application change separately, then evaluate the resulting sample as a complete garment.
Check left and right symmetry without expecting a garment to behave identically on every individual body. A flat inspection can identify uneven binding, twisted seams or inconsistent application. A fitting review can reveal riding, rolling or excessive pressure for the intended wearer group. These observations answer different questions and should sit alongside each other in the feedback record rather than replacing one another.
When a leg edge needs correction, specify the exact location. For example, a request to reduce pressure at the front opening while preserving back coverage is more actionable than make both legs loose. The proposed solution may involve the curve, the trim or the sewing process. Keep an approved sample of the final edge construction, especially if multiple factories or repeat orders will use the same product specification.
5. Develop the front panel and lining as a system
Draw the front panel arrangement clearly, including any centre seam, overlapping construction or opening. State whether a functional opening is required; its presence should never be inferred from decorative seam lines. Define the intended front shape and coverage in the technical specification. If a reference garment includes a feature that should not be copied, mark that difference directly on the drawing.
Where a lining or double layer is specified, identify its material, dimensions and attachment points. A lining should not be described only as soft fabric because that phrase does not identify the approved component. Record the direction of stretch and how the inner edge is finished. Check that the inner and outer layers lie together as intended without unwanted folds or an exposed rough seam allowance.
Inspect the junction where the front panel meets the lower body section. Several seams or layers may converge in a small area, making construction quality more important than the outer appearance alone suggests. Ask for inside photographs during sample review and examine the physical garment before final approval. A clean photograph of the front cannot establish how bulky or smooth that junction feels in use.
Treat changes to the front shape as pattern changes requiring controlled review. A more prominent shape may be a design preference, but it should not be marketed with unsupported functional promises. Confirm the desired silhouette, revise the drawing and compare the updated sample against the agreed wearing position. For a coordinated underwear range, keep separate front construction records for briefs and custom boxer briefs.
6. Approve waistband dimensions and recovery
Specify waistband width, appearance, material reference, colour and the position of any lettering. Describe whether the elastic is exposed or enclosed. The finished waist measurement and the elastic component length are different records; both may be needed to understand the construction. Ask the supplier how the joining allowance and application process are controlled before assuming that a trim length will equal the garment circumference.
Review the inner face of the elastic, its edges and its join. A visually striking outer surface does not establish the wearing feel of the inside. Inspect for twisting, raised thread ends and inconsistent alignment at the join. The sample should also show whether the join is positioned at the intended location and whether any branding remains visually balanced around the completed loop.
Agree how waistband stretch and recovery will be assessed and what acceptance criteria apply. Those criteria should be suitable for the selected component and product, rather than copied from a different underwear range. If repeated extension or laundering is part of the evaluation, record the method and conditions. A statement that an elastic is premium is not a substitute for an identified component and an agreed assessment.
Branding introduces another approval route. Supply authorised artwork, repeat dimensions, colour references and placement rules. Do not copy the SPORT lettering shown in the example photographs as though it were a brand requirement. The images illustrate a visible waistband style; your order needs its own approved identity. Confirm artwork ownership and agree how deviations in logo position or repeat alignment will be classified before production begins.
7. Control seams, thread and elastic application
Use a construction sheet to identify seam types and finishing methods at the side, front panel, lower join and leg openings. Mark which face of each seam is visible from outside and how the inside should be finished. The goal is a reproducible assembly instruction rather than an assumption that the sewing team will infer every detail from a finished reference photograph.
Thread, needle selection and stitch settings need to suit the actual material and seam function. The technical team should establish the settings through sampling and production preparation. Ask for evidence that seams tolerate the intended garment extension without obvious failure. Do not prescribe a universal stitch density or thread specification merely because it worked on a heavier garment or on an earlier underwear fabric.
For background, CottonWorks garment construction resources explain that garments use different seam, stitch and component combinations. Apply that principle by identifying the construction that your brief actually needs. The reference is educational; it does not verify any particular sample, supplier capability or bulk production result for this project.
Inspect the inside after the sample has been handled and evaluated under the agreed conditions. Look for broken or skipped stitches, loose ends, rough joins and distortion around elasticated curves. Record the location of each issue with a close photograph and a concise instruction. If correcting a seam changes its width or stretch response, check the neighbouring fit points before treating the correction as complete.
8. Build a measurement chart that operators can repeat
Prepare a measurement diagram for every point of measurement, using one agreed unit throughout. Typical records may include relaxed half waist, side depth, front rise, back rise and leg opening, but the exact chart depends on the construction. Define whether measurements follow a curve or a straight line. Include the waistband and binding consistently according to the instructions shown on the diagram.
State whether the garment should be relaxed and how it should be laid on the measuring surface. A stretchy brief can produce a misleading reading if the operator pulls the edge while aligning it. Measurement training should include the handling method as well as the numerical target. Where an extended measurement is necessary, define the method clearly instead of asking different operators to apply an undefined amount of force.
Set tolerances by measurement point with technical input. A single tolerance applied to every dimension may not reflect the visual and functional importance of the different areas. The specification should explain which deviations require escalation and how borderline results are handled. Numerical conformity should also be considered alongside appearance and fitting evidence, because a garment can meet several flat measurements while still needing a pattern correction.
Keep the approved chart, pattern reference and physical sample connected through a shared revision number. If a comment changes front rise, update the chart and the drawing together. Old spreadsheet attachments can otherwise survive in different inboxes and create contradictory instructions. The apparel tech pack checklist offers a useful starting structure for keeping these records together throughout development.
9. Validate grading across the full size range
A successful base size does not prove that all other sizes will perform as intended. Define the size range and grading rules before confirming the bulk assortment. Pay particular attention to how rise, side depth and leg opening change across sizes. Increasing every point by an identical amount may not preserve the intended proportions or accommodate the customer group targeted by the collection.
Request a size set according to the development plan and review the sizes that carry the greatest uncertainty. The smallest and largest sizes can reveal problems hidden by a satisfactory middle size. Record which sizes have been physically assessed and which conclusions remain provisional. If a complete set is not available at an early stage, the approval record should state the limitation rather than implying the entire range is closed.
Check branding and trims across sizes as well as body dimensions. A waistband logo repeat may land differently as the loop length changes. A label that fits comfortably into the base size may sit awkwardly in a narrower side section. Confirm whether artwork dimensions remain fixed or change by size and whether the placement measurement is taken from an edge, seam or centre point.
After grading changes, review the affected sizes again and keep a final reference for each approved configuration. If a retailer later adds a size, treat that extension as a development decision instead of extrapolating silently from the previous chart. The same principle applies when a new fabric is introduced into an existing range: the old grading logic should be checked against the revised material and garment behaviour.
10. Review washing, colour and appearance evidence
Agree the care route proposed for the finished product before arranging wash evaluation. The test conditions and assessment criteria should reflect the intended garment and destination requirements. Record the initial measurements, condition of the sample and identity of the fabric and elastic. Without those records, a later discussion about shrinkage or appearance may compare different materials or differently handled samples without anyone recognising the mismatch.
Evaluate the complete brief, including the waistband, seams, front lining and leg edges. A fabric swatch assessment cannot reveal every interaction between those components. After the agreed washing and conditioning process, inspect dimensional change, seam appearance, colour behaviour and the way components lie together. Record the actual observations rather than using a blanket statement that the sample washed well.
Where laboratory evidence is needed, agree the relevant methods and acceptance limits with the responsible technical team or laboratory. Do not invent a pass threshold from an unrelated product. Different colours and trims may need their own evaluation, particularly where contrast components sit next to lighter fabric. Ask whether reports correspond to the actual material references, colours and finished construction proposed for the order.
Translate the results into specific decisions. If a leg binding becomes distorted, determine whether the cause sits in the component, application or underlying pattern before revising the specification. If a fabric change is approved, reassess any test conclusions that depended on the original material. Retain both the pre evaluation and post evaluation records so a repeat order can be compared with a documented development history.
11. Check labels, packaging and substantiated claims
Plan the location and attachment of the brand, size, composition and care information as part of the garment development. A label position chosen at the end can create an awkward join or interfere with an otherwise satisfactory fit. Assess the approved label material on the actual sample, including the reverse face, cut edges and attachment stitching. Printed information also needs a clear artwork and durability review.
Confirm the required information for the destination market with a qualified compliance resource. Requirements can depend on product, market and distribution route, so this article does not provide a universal legal label template. Ensure that the final wording matches verified material records and the approved care instructions. Do not describe a blend as pure cotton or add an origin, certification or environmental claim without supporting evidence.
The official OEKO-TEX STANDARD 100 information explains its framework for textiles tested for harmful substances. If such certification is required, request the relevant current documentation and verify its scope for the proposed product. Linking to the standard does not establish that M&A Composite Ltd, the example garments or your future order holds certification.
For packaging, specify individual presentation, size identification, barcode artwork, assortment and carton information. Check that a multipack contains the approved size and colour combination rather than merely the correct total quantity. Review a packed sample before release so folding, labels and garment presentation can be assessed together. Any sustainability wording on packaging should follow the same evidence discipline as the claims made about the garment itself.
12. Compare quotations using the same approved scope
Send each supplier the same revision of the design, measurement chart, material references, size range and packaging requirements. Explain which quantities are estimates and which are ready for confirmation. A quotation for a simple single colour brief cannot be compared directly with one including custom elastic, multiple materials and retail multipacks. Record inclusions and exclusions before deciding which proposal offers the better commercial fit.
Ask how minimum quantities apply by style, colour, fabric and customised trim. A supplier may be able to sew a small garment quantity while a nominated waistband requires a larger component commitment. The actual conditions must be confirmed for the project. Avoid presenting a generic minimum order or lead time as an M&A promise when the specification and sourcing route have not yet been agreed.
Separate the development schedule from bulk production and shipping arrangements. Clarify what triggers each stage, including receipt of the final technical pack, material approval and written sample acceptance. If a decision is delayed or a nominated trim changes, request an updated plan. A calendar date without its dependencies can give a false impression of certainty and make later conversations about responsibility unnecessarily difficult.
Finish the comparison with an exception list. Identify unconfirmed material, missing testing, unresolved fit points and packaging assumptions before accepting the commercial offer. Where a cheaper alternative is proposed, assess its effect on the approved garment rather than judging the saving alone. Send the resulting scope through the M&A Composite Ltd enquiry page for a project specific discussion and written confirmation.
Construction comparison: choose a coherent brief specification
Use the comparison table as a discussion aid when selecting a direction for custom briefs. It lists construction choices and the questions that accompany them; it does not rank one material or finish as universally superior. The final decision should match the target customer, intended price position and evidence from the actual sample. Availability and commercial terms must be confirmed separately for the project.
A style with an exposed waistband creates a different visual emphasis from a covered elastic waist. Either direction still needs an approved inner feel, join and recovery assessment. Similarly, a binding detail may contribute to the visual identity of the product while adding another component and application process to control. Keep the design benefit visible alongside the additional sourcing and inspection requirements.
Do not use the photographs as a complete bill of materials. Their burgundy and black colours and striped waistband details are visible, but the fabric composition and performance cannot be determined from the image. Treat the images as conversation references and ask for actual swatches, component samples and construction information. Every image in this article opens the related product page for further discussion.
When narrowing the options, choose one proposed baseline and document alternatives as separate revisions. Mixing the waistband from one sample, the body fabric from another and the fit approval from a third can leave no single garment representing the final intention. Arrange a consolidated sample in the agreed materials and compare it with the complete current specification before authorising production.
| Decision | Option to discuss | Evidence to approve |
|---|---|---|
| Waist finish | Exposed or enclosed elastic | Inside feel, width, join and recovery |
| Leg edge | Binding or another specified finish | Curve, application and wearing review |
| Front construction | Shaped panels; lining if required | Inside assembly and fit sample |
| Fabric direction | Identified knit and composition | Approved swatch and garment evaluation |
| Brand identity | Authorised custom artwork | Final artwork and component sample |
Sampling approval gates for custom briefs
A sampling plan is most useful when each stage ends with a named decision and a clear record. The progress bars below show an illustrative seven gate sequence, not the live status of an order, a delivery promise or a percentage completion report from M&A Composite Ltd. A project may need a different sequence, additional rounds or parallel material work depending on its complexity.
Start by agreeing the design and material direction, then use a development sample to identify the major pattern and construction questions. Fit comments should refer to specific points and explain which changes are required. Keep the sample reference in every feedback message. A dated photograph without a style code or revision can become difficult to connect to the physical garment when several similar samples exist.
Once the principal fit is satisfactory, review the size set, selected materials and agreed evaluation evidence. A preproduction sample should bring the final decisions together instead of relying on a collection of verbal approvals. If an approved item is substituted, reopen the affected gate. Approval is a controlled record of a particular specification, not a permanent permission for later changes to unrelated materials or construction.
Use the garment sampling checklist to organise submissions, comments and sign offs. Name the person responsible for responding at each stage and identify the evidence needed to close it. This makes unanswered questions visible early and helps both sides distinguish a sample submitted for discussion from one formally approved as the reference for the next production activity.
Illustrative approval gates — not live order tracking.
Inspection records and a practical enquiry checklist
Before production, agree how inspection will be organised, which defects need immediate escalation and how acceptance decisions will be recorded. Include visual workmanship, measurement, component identity, size identification and packing checks. The inspection plan should be suitable for the order and established by the responsible teams. This article does not prescribe a universal sampling quantity or acceptance level for every brief collection.
The example feedback table below is fictional and demonstrates how to turn an observation into a corrective action. It is not an M&A production report or evidence of a real defect. A useful record states the sample code, exact location, observable issue, requested action and review status. When a correction is submitted, compare it with the original concern and note whether further fit or washing checks are needed.
For your initial enquiry, assemble sketches, product references, target customer, proposed sizes, estimated order quantities and intended sales market. Add material preferences, waistband artwork, label information, packaging concept and the dates you are planning around. Indicate which details are fixed and where you welcome technical proposals. Clear inputs allow the discussion to focus on feasibility instead of repeated requests for basic missing information.
M&A Composite Ltd presents its product range and company information through the company overview and linked manufacturing pages. Use those pages as a starting point and confirm the proposed manufacturing route and project requirements directly. For custom briefs, a dependable approval process begins with one coherent specification and finishes with a sample, records and commercial scope that describe the same product.
Illustrative feedback log: fictional examples only.
| Fictional sample record | Observation | Action and next review |
|---|---|---|
| BR-DEV-01 | Left binding appears uneven | Review application; submit corrected sample |
| BR-FIT-02 | Back waist drops when seated | Review back balance with fit team |
| BR-ART-03 | Logo position differs from drawing | Confirm repeat and placement reference |
| BR-PACK-04 | Multipack colour sequence differs | Revise packing instruction and resubmit |
Frequently asked questions about custom briefs
What should I include when requesting custom briefs?
Send front and back sketches, a measurement chart, size range, material preferences, waistband details, quantities and destination market. Add reference samples if available and identify unresolved decisions. A supplier can then review feasibility and quotation assumptions against a defined product rather than a photograph alone.
How are briefs different from boxer briefs during development?
Briefs have a different leg opening and coverage arrangement, so their pattern balance requires separate review. Side depth, front and back rise, seat coverage and elastic application matter together. Removing leg length from an approved boxer brief does not by itself establish an approved brief pattern.
Can I choose my own waistband branding?
Provide authorised artwork, repeat dimensions, colour references and placement instructions for review. Confirm the trim development process, quantities and approval requirements directly with the supplier. Lettering visible on a product photograph is an example detail and should not be copied without the appropriate rights and approval.
Which fabric is best for custom briefs?
There is no single best fabric for every collection. Compare the proposed composition, knit structure, weight, hand feel and stretch behaviour against the intended customer and approved fit. Assess the complete garment using the selected fabric, elastic and seams before treating a material choice as final.
Why can the leg opening feel tight when measurements look correct?
The pattern, binding, elastic length and application process all influence the finished opening. A flat measurement records only part of the construction. Review the precise location of the concern and compare fitting observations with the component and sewing records before deciding which change to make.
Should the complete size range be sampled?
Agree a size set plan that addresses the risks of your range. A satisfactory base size does not prove that grading and trim placement work in every other size. Record which sizes have been assessed and keep unresolved approvals visible until the agreed review has been completed.
Do the example images prove material or certification claims?
No. Images show visible colours, shapes and construction details, but they do not establish fibre composition, certification, test results or availability for an order. Request current documentation and actual component references for the proposed specification before making related product claims.
What is the minimum order and production lead time?
Request written confirmation for the actual specification. Quantities may depend on style, colour, fabric and customised trims, while timing depends on sourcing and approvals. This article does not state a fixed M&A minimum quantity, price or delivery promise for all brief projects.
Are the progress bars tracking my order?
No. The bars illustrate seven possible approval gates for a development plan. They are not connected to a live order system and do not represent a completed percentage or a guaranteed schedule. Your own project needs an agreed plan and named approval responsibilities.
How can I discuss a private label brief project with M&A?
Open the linked Brief product page or contact page and share your specification, estimated quantities and key requirements. Include your proposed size range, materials, branding and packaging details. Ask for written confirmation of feasibility, approval steps, commercial scope and the documentation needed for the intended market.
Discuss your custom briefs specification
Share your drawings, size range, material requirements and estimated quantities for project specific review.